top of page
fondo ej-15.png

CHALLENGE 1 - introductory course

Install programming software

15 min 

STEP 1

Press the button to go to the Arduino page. Follow the download instructions depending on your operating system (Windows, Mac or Linux).

Captura de pantalla 2024-09-30 a la(s) 12.24.04.png

STEP 5

Descargá el archivo y subilo a Mblock.

Puedes usar el mismo archivo que en el ejercicio anterior.​​

Captura de pantalla 2024-09-30 a la(s) 12.28.18.png

STEP 8

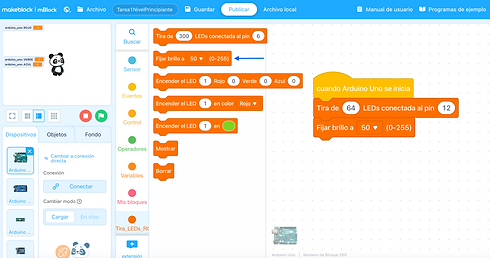
I defined the chosen digital PIN.

This PIN is the one we use to connect the LED Matrix to the Arduino.
Captura de pantalla 2024-09-30 a la(s) 12.35.34.png

STEP 8

I defined the chosen digital PIN.

This PIN is the one we use to connect the LED Matrix to the Arduino.

Captura de pantalla 2024-10-09 a la(s) 14.37.41.png

STEP 8

I defined the chosen digital PIN.

This PIN is the one we use to connect the LED Matrix to the Arduino.

Captura de pantalla 2024-10-09 a la(s) 14.38.03.png

STEP 8

El bloque "lee pin digital 3" hace referencia a una acción que permite leer el estado de un pin digital específico, en este caso, queremos que el pin 3 que esta conectado al Botón 1, ejecute una acción.

Captura de pantalla 2024-10-09 a la(s) 14.39.46.png

STEP 8

I defined the chosen digital PIN.

This PIN is the one we use to connect the LED Matrix to the Arduino.

STEP 8

I defined the chosen digital PIN.

This PIN is the one we use to connect the LED Matrix to the Arduino.

Captura de pantalla 2024-10-14 a la(s) 14.58.47.png

PASO 9

En ¨mis bloques¨ seleccionamos prender patalla completa, para que prenda las 64 LEDs. 

=> Prender pantalla completa

=> Mostrar

Captura de pantalla 2024-10-14 a la(s) 15.10.02.png

STEP 7

Tell your Arduino which port it is connected to.

Tools/Port/*select_port*


You have to mention dev.Arduino Uno, dec/cu.usbserial or COM. If many appear, try until it lets us upload.

fondo rayas blancas-16.png

CHALLENGES

1: I uploaded another animation

2. We challenge you to program a condition that triggers another animation with another button.

Tip: First you need to change the button definition to B1, B2. Don't forget to set the new buttons as input.


logo_Working table 1.png

Build and learn to program your own game console with your PIXO kit!

FAQ

GAMES

EXERCISES

CONTACT

Montevideo, Uruguay

+598 94 552 139

  • LinkedIn
  • Instagram
  • Youtube
bottom of page