
CHALLENGE 1 - introductory course
Install programming software
15 min


STEP 8
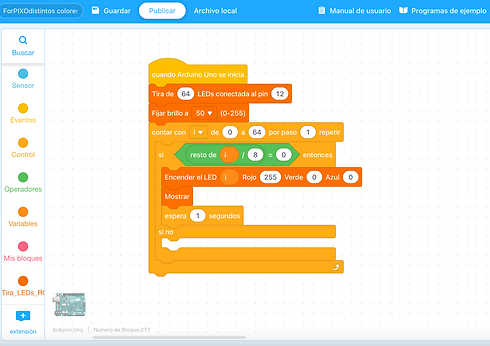
I defined the chosen digital PIN.
This PIN is the one we use to connect the LED Matrix to the Arduino.

STEP 8
I defined the chosen digital PIN.
This PIN is the one we use to connect the LED Matrix to the Arduino.

STEP 8
I defined the chosen digital PIN.
This PIN is the one we use to connect the LED Matrix to the Arduino.

STEP 8
I defined the chosen digital PIN.
This PIN is the one we use to connect the LED Matrix to the Arduino.

STEP 7
Tell your Arduino which port it is connected to.
Tools/Port/*select_port*
You have to mention dev.Arduino Uno, dec/cu.usbserial or COM. If many appear, try until it lets us upload.

STEP 8
I defined the chosen digital PIN.
This PIN is the one we use to connect the LED Matrix to the Arduino.


CHALLENGES
1: You will be able to change the brightness of the LED Matrix to the maximum and turn it on with the color Red
2: It will manage to change the brightness of the LED Matrix to an intermediate level and turn it on with the color Green
Ex 3: Achieve the SECONDARY colors,
these are Yellow, Magenta and Cyan.
Secondary colors are formed by combining equal parts of the primaries. Do you dare to program them?
STEP 8
I defined the chosen digital PIN.
This PIN is the one we use to connect the LED Matrix to the Arduino.

STEP 8
I defined the chosen digital PIN.
This PIN is the one we use to connect the LED Matrix to the Arduino.


I defined the chosen digital PIN.
This PIN is the one we use to connect the LED Matrix to the Arduino.


STEP 8
I defined the chosen digital PIN.
This PIN is the one we use to connect the LED Matrix to the Arduino.
STEP 8
I defined the chosen digital PIN.
This PIN is the one we use to connect the LED Matrix to the Arduino.

STEP 7
Tell your Arduino which port it is connected to.
Tools/Port/*select_port*
You have to mention dev.Arduino Uno, dec/cu.usbserial or COM. If many appear, try until it lets us upload.